If
you are doing this through the Browser User Interface (BUI) then the
first thing to do is point your browser at the management administration
interface for the ZFS Storage appliance on port 215. Connecting to the
active storage head.
https://<IP of active storage head>:215/
Log on to the service and navigate to the shares tab then pick the Projects sub-tab.

Give
your project a suitable name, say MyProject. You can now select this
project from the Projects page to edit it. This is done by highlighting
the MyProject line and clicking the pencil icon to edit it. Now we
want to do some basic best practice configuration.
- Click
on the General tab and specify the "Mountpoint" to be
/export/<project name> This will mean that all the data and
shares held in this project will be contained within a single directory
structure on the storage device. The rest of the General settings can
be left at the defaults in the first place.
eg. /export/myproject (Minor unix standard to use lower case characters, if you do use mixed, bear in mind it is case sensitive.) - Click onto the Protocol tab.
- Set the Share Mode to be None. This stops anyone but the nodes that are specifically defined connecting to the share.
- Click on the + symbol beside the "NFS Exceptions" to add an exception. I tend to use the Type of "Network" and define a network/netmask as the Entity to specify which compute nodes/vServers can access the share. In a virtualised Exalogic the default vServer shared storage network is 172.17.0.0/16 so giving these read/write access is the norm. There is also a tick box for "Root Access", this defines what is known as root squash which determines if the root user of a connected client has root access to the files in the share. Unless specifically needed this should not be enabled.
- Add additional networks as needed for your environment.
- HTTP - if you require access to the shares via an HTTP interface then set the share mode for this protocol to be read only.
- Replication - No need for this in a very simple test environment but for all other environements the Replication tab allows you to define backup locations for the share.
- Click on the Shares tab
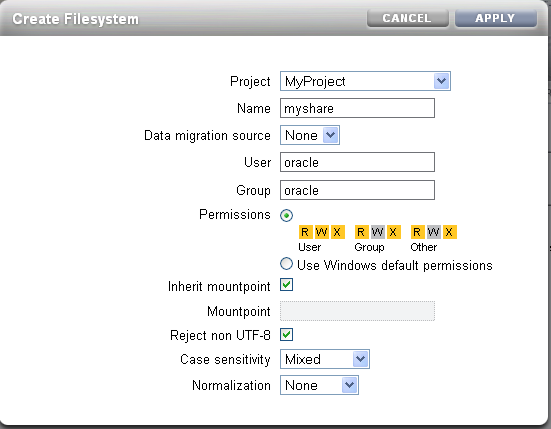
- For
each share you wish to create click on the + symbol beside the
Filesystems, give your share a name. The other options such as the User
and Group and permissions are really dependent on what the needs of
your environment are. In the example shown below the assumption is that
the share myshare will be mountable from /export/myproject/myshare (the default), and once mounted will show up as being owned by oracle:oracle.
Note :- you may find that the appliance objects to the owner of oracle:oracle as an unknown user and group. If you are just using NFSv3 then you can enter the ID for the oracle user in here which will transfer over to the client server. If using NFSv4 then the user must exist in the shared authentication location - LDAP or NIS.
- For
each share you wish to create click on the + symbol beside the
Filesystems, give your share a name. The other options such as the User
and Group and permissions are really dependent on what the needs of
your environment are. In the example shown below the assumption is that
the share myshare will be mountable from /export/myproject/myshare (the default), and once mounted will show up as being owned by oracle:oracle.
Now all you need do is mount this share from a compute node (Physical Exalogic) or vServer (virtual Exalogic)
# mount <ip of storage>:/export/myproject/myshare /mnt
or if you want it to be auto-mounted on boot add it to the /etc/fstab file on a directory such as /u01.
No comments:
Post a Comment